Sunday

Collecting Yarrow Seeds


Yarrow this plant is a multitasker. I always used it to attract and feed Monarch Butterflies. I have come to find out after doing a little research that this plant has so many great benefits both for your health and your garden. 

Yarrow is an herb. The above ground parts are used to make medicine also. I have put a link at the end of this post for you to grab more information on its medicinal uses.


Collecting the seeds could not be easier. I spent years with this in my garden without realizing that the seeds were bountiful and easy to collect

This flower comes in a variety of colors but you see yellow and orange here in Southern California mainly. 

Let's get right to collecting the seeds since that is why you are here. Once the plant has flowered for its season. 

This will last from late spring throughout summer. I do not cut back my yarrow so I have the seeds once they have dried.


Here is a picture of the stocks I cut off for the seeds. The seeds when left on the plant long enough will just naturally fall off and reproduce but they need water and sunshine. So better to save them for Spring Planting.


Gather all the yarrow stalks you need there are a bazillion seeds on each one. 


I first cut the stem off and put the dried flower into the palm of my hand and gently roll it over a colander.


The seeds may be mixed with the plant head itself so I gently roll them in the colander. They will drop into the pie tin and from there I will bag and label them.

Most seed are so easy to get from a dried plant that at times I do have to giggle when I see people buying them. But on the other hand you do have to buy many seeds you do not harvest or collect. So I have to say every Spring I order my seeds for my spring garden usually ones that are unusual and rare. 


So many right? It is truly amazing what these flowers produce. I think they give me the most seeds of any of the ones I collect. Alright now bag them and have them ready for Spring and Sumer flowers for your butterflies.

 Here is a link all about the Yarrow plant.


Yarrow as an Herb Based Medicine. Another great resource.

Broccoli Seeds


This was a good experiment letting my broccoli go to seed. What a great lesson in gardening. I am getting more into letting some of  my vegetables and flowers go to seed. My sister  Casey use to let her Delphinium and other flowers go to seed and would give me seeds all the time. I am still finding paper bags of seeds from her. I thought she was a bit nutty but now I see her point.


To the left you see a broccoli plant that I did harvest quite a lot from. Once I was done with it I let it go to seed. See the pretty yellow flowers?


Now it has grown out as much flowers as I think it can.  It gets long and stocky. 
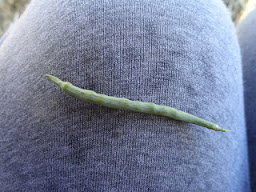
The seeds are strange looking they are long like a green bean with anorexia.


Here are the direction:


1. Allow the broccoli plant to bloom instead of harvesting when it is in the bud stage.  The broccoli plant will send up a flower stalk covered with yellow flowers that are very attractive to bees and other pollinating insects during the blooming process.


2. Place a paper bag over the broccoli flower when the seed pods are brown and beginning to split open. You can see the black broccoli seeds inside the split seedpods when the seeds are ready to harvest.

3.Grasp the paper bag with one hand so it creates a seal around the stem. Cut the stalk with a pair of hand-held garden shears so the flower head remains in the bag. This prevents seeds from falling to the ground when the flower stalk is moved.

4. Turn the flower head upside down so it stays in the bag.

5. Remove the flower head from the paper bag and spread the seeds on the dry newspaper. Crumble the seed pods to release the numerous broccoli seeds and separate the seeds from the dried plant material. Allow the seeds to dry for three weeks while spread over the dry newspaper in the warm and dry location.

Place seeds in a dry jar with a tight-fitting lid and store at room temperature until the following season. Broccoli seed will remain viable for one year if dried and stored properly.

Tomato Seeds

 Saving seeds is a hobby I just love. There are some rules to this hobby. The main thing is you do not want to save seeds from any store bought fruit or vegetables. Those could have been sprayed with pesticides and also almost 99% of store bought fruit and vegetables are hybrid which means they will only produce one generation.


You can save them if you want to try. 

Get seeds that come from a reliable source:

  • Your Garden
  • Farmers Market
  • Neighbors Garden
Tools you will need:

  • Bowls for each type of seed (Like Beef Steak, Roma etc)
  • Small jars for each variety
  • Strainer
  • Cheesecloth
  • Rubber Bands
  • Small spoon
  • Labels/Small Post its or piece of paper


Back to business take the tomato you want to save the seeds for and cut it in half. You will see the seed and take your spoon and scoop the seeds out into the bowl. Do not worry about the gunk sticking to your seeds we will clean that off later. Once you have gotten the seeds out for both sides of your tomato you can still use that tomato for a meal or snack. 


Do the rest of the tomatoes at the same time keeping them separate and having labels. 
There have been times when I did not label and it was a guessing game the following Spring. 

Now you should have all you seeds out and ready to be cleaned. 


Take each bowl and pour your gunky seeds into the strainer run cold water over them while lightly rubbing the gunk off as much as you can. This is only the first cleaning it just get the large stuff off. 


Each different type of tomato seed will have its own container take the seeds and put them in a jar and fill that jar half way up with cold water. Some seeds (the bad ones) will float and then others (the good ones) will sink.  Once they are all cleaned and in their jars cover the jars with cheesecloth and secure with a rubber band. Let them sit for at least one week. This is when they are germinating. 


Now after the one week take each jar and get rid of anything that is floating. If you pour the liquid out gently the top stuff drains out. There may be some extra but that just use a spoon to grab them our. Get your strainer back out and clean the seeds that have sunk to the bottom
 those are the good seeds. 


You will need some paper towels to dry them. Just lay them out on the wax paper or clean plate label it. I don't use the paper towels to dry them they end up sticking and it is a pain in the butt to separate. Once the seeds have dried which takes about 3 weeks they are ready to get bagged. 


I save all containers. The small seeds in this post were saved in an old makeup container and the large batch in an old cassette tape box. Boom

Done! I use bags when I am trading seeds Make them cute they make a great gift with a little garden pot of soil. 


Saving Zinnia Seeds


Zinnia flowers are the easiest flowers to grow from seed. Collecting the seeds is just as easy. This is not going to take to much time to explain. And on top of it I planted some seeds to make sure they are really seeds. It blows me away when I see some types of seeds and say Nahh this can not be a seed. This flower seed is one of them. 

This process is going to be so simple let's get started. Let your Flowers grow. Zinnia's are very hardy and strong. 


When the Zinnia has started to brown and dry up leave it on the stem. I have found the longer you leave anything you expect seeds from the better. It makes the seeds more potent and strong. The seeds of this flower are on the end of each petal. I first cut the dry flower off the stem. The petals of the Zinnia stay in place until you remove them. Cut the Zinnia flowers off and collect them in a vessel of your choice. I use old pie tins for so much of my Seed Saving.


Now that you have the dried Zinnias gently pull the petals off the flower. I keep the colors separate. They still have color left on them even dried up. 

Store the seeds in any container that will keep them dry. I put them in a plain envelope for a few months until I packaged them. Look at the picture of the petals in my hand the seeds are attached to the end. It looks like the seeds are nothing flat and boring But they are good I planted some a few weeks ago and they popped right up.


Separate the leaf from the seed. I have given you pictures to show you what they will look like. 

So there you have it easy peezy good luck and leave any
questions or comments below!

Germinating Lavender Seeds

This year a new experiment is with Lavender. I have collected some seeds from the garden as well as purchased some from are my go to site this year Rare Seeds they have a wide variety of many rare seeds you can no longer get except there. To start my adventure I did a lot of research. I had no idea the lavender needed so much attention. 

Once I got my seeds I did as the lavender pros before me have done. Here is the list of the first things to do

Tools

  • Seeds
  • Paper towels
  • Larger paper bags
  • Refrigerator

Lavender seeds need winter to get their germination process started. Here n Southern California Zone 8/9 we need to fake that winter cold by putting the seeds into damp paper towels. Once they are on the paper towel gently fold them, label and put them into the refrigerator for at least 8 weeks if not longer.


Once the soil has warmed up and the seeds are cold ready we can start yet another long process. Germinating the seeds. this can take up to 4 - 6 weeks. Yes I know the local garden store looks pretty good by now. Last night I was reading the lavender seed packets from the mail order and guess what it said. LOL No need to germinate. What the Help! 

So now this will be two ways to grow lavender. From seed already germinated that we will plant today and continue the from seed germinators. 

Amaryllis Seeds how to collect seeds


Amaryllis Flowers are one of many bulbs with flower for your patio or garden. I have started most of mine in a pot on the patio. It was just this year I transplanted some into the garden. The wonderful thing about bulb plants is that they are so easy to care for. They go in the ground bloom and then when they die back they go away only to return the the following year. I love that I always forget but when I see the bloom start I get so excited. 


This post is to show you how to harvest seeds from your amaryllis bulbs. Like any bulb you must let the flower dry and no cutting the stem until it has completely dried. This puts all the energy back into the plant for next season. With that in mind. Keep an eye on the bulb. Here are some pictures and information to help you better understand what you are doing to collect the seeds from the amaryllis plant.


This is the plant when it has stopped it's bloom. The bloom has begun to dry. It will be left with three or four pods on it. They are green when they start to dry you will note the flower leaves are still attached no worries it falls off in time. 


It takes several weeks for these pods to dry out so just leave it alone and be patient. Many a gardener do not want to wait and or have this ugly thing drying in there yard. It is the people who understand and want to propagate seeds that get it. 


You will see in the picture to the right the bud has dried and is beginning to open. This is the time to get the seeds. I cut the dried bulb on to a pie tin or any flat object with a rim. Once you have done this let it dry out for a day or so. Then carefully cut the bulb off into a container. 


Once the pods are cut t is super simple to separate the seeds for planting. Once they have dried for at least two weeks you can propagate them. But that is another post. These seeds take 2 + year to propagate. 

Enjoy

Nasturtiums grow and seed saving

  Nasturtium flower what a delight and easy flower to grow. The bonus is is comes back every year and self seeds your garden on it's own...