Saturday

Nasturtiums grow and seed saving


Nasturtium flower what a delight and easy flower to grow. The bonus is is comes back every year and self seeds your garden on it's own. Orange, red and yellows are just three of the main colors of this flower.

They can be container grown or in your garden landscaping. 


I have scattered seeds with a dusting of soil and Bam there they go! 


A few more quick things with this easy flower is it is a great companion for vegetables. They love to attract and trap aphids and other veggie pests. Vegetable's like beans, broccoli, cabbage, cucumbers, kale, melons, pumpkins and radish. 


Another bonus is butterflies and bees love this flower. Hummingbirds also. They have a great fragrance. the two types of nasturtiums are trailing and bush.

The great feature of these flowers is the ability to eat them. They are a beautiful garnish to any plate. The seed pods have a mustard like taste and are delicious in salads. 

Planting these flowers could not be easier. I have found direct into the grounds works wonderfully. You can start them indoors but the root are tender and do not take really well to transplanting.

They love full sun. I have planted the in full sun as well as under trees where the sun hits for at least one hour a day. Plant them one half inch below the service. I have actually dropped seeds into the soil around the yard to find plants growing with in a few weeks. Top the seeds with a light cover of soil.


Once you have established your flowers you can cut back to keep the flowers growing through the season. I let mine once a year go to flower and dry on the vine. This gives m many new seeds to spread else where.


Once you have established your flowers you can cut back to keep the flowers growing through the season. I let mine once a year go to flower and dry on the vine. This gives me many new seeds to spread else where.


The seeds are so easy to collect. 

As stated earlier I do leave my flowers to dry on the plant thus getting so many seed. Here are a few pictures so you know what to look for. Notice the flowers in the picture to the right. There are still many flowers blooming but the ones I have left on to dry have left me with some great seeds. 


Here are a few seeds still on the plant. Ready to pick and save for next year.


To the right you will note some of the seeds that fell to the ground. These can be left to grown next year or collect to scatter else where.


This flower is so easy and so useful is so many way. A great addition to any garden. I collect the in my won yard as well as any where I see a bush. Any questions just leave a comment. Happy Gardening !

Sunday

Growing Garlic So. Cal

Garlic is probably one of the easiest bulbous vegetables to grow. I have experimented with two way's this season to grow garlic. In November I placed some elephant bulbs into my troth these are not doing really well they are alive but puney. 


The garlic you see on the plate are the cloves I started in Fall. The instruction's read as follows:

FALL PLANTING: Plant cloves in mid Autumn in a sunny location with rich well drained soil. Set cloves root side down 4-6" apart. **Note the root side is the flat end*** Set the cloves 1-2" apart and cover them with 1-2" of soil. 

SPRING PLANTING: Plant cloves as early in Spring as soil can be worked, the same time you set your onions. Spring planted garlic should be put in the ground the same way as your Fall planting.

In Autumn/Fall I planted some of my Elephant Garlic in my troft on the hill. It is now Spring and I am not at all impressed with my job. They grew very puney and well at least not dead but they are doing horrible. I am the first to admit when something has gone a-rye. I think it is the drainage but we are going to do a different post on the problem and solution. 

I also started garlic in my canvas bag, and some in small containers for next season.

Let me tell you about garlic in general. Garlic is from the allium genus that also includes onions, shallots, leeks, scallions, chives and regular Alliums. Here in this post we are growing garlic from cloves. This is easier than from seed/bulbils.

There is a great deal to planting garlic and I will not go into at this time. Buying a bulb of garlic at the store to plant at home is not good. It either comes from China or California and has been sprayed with who knows what. Also, it may not produce the flavor you want from a garlic clove.


I did start some garlic this season in a garden bag. These are great for so any vegetable's when you do not have the room or want to keep your stuff close to check regularly.

These were a Spring planting so we will keep you updated on these.


I also put a few into small containers to get them started and the roots
going. 

To plant your garlic break apart the clove do this a least one week prior to planting. Do not remove the paper husk around it. This protects the bulb. Plant them with the wide root area down. The tip is top. 2 inches deep and 10 inches apart.

Please be patient it takes your garlic at least 9 months to mature and elephant garlic when left just gets bigger and bigger but can loose it taste it to long in the ground.

Enjoy and try planting twice a year in Spring and Fall and have fresh garlic to share year around. It is early fall and I promise to post a picture on our FB page in the late Fall.

Monday

Seed Saving


Welcome to the page that will help you to collect and save your own seeds. Our Mission here at Simi Valley Seed Savers is to grow our Community of Seed Savers. 


Seeds is a lifeline to the past and a road to the future. Some seeds that have been collected through out history come from generations of Seed Savers. Just think with out them we would not have the bounty of wonderful seeds to plant that we enjoy today. 

Here is a list of the ways and types of seeds you can collect and How to

Flowers

 Amaryllis Seeds

Germinating Lavender Seeds

 Yarrow Seeds

 Zinnia Seeds

Vegetables

Broccoli Seeds

Tomato Seeds

Here are a two of my go to Seed Producers

Baker Creek Heirloom Seeds

Seed Savers Exchange


Tuesday

Pumpkin Recipe for Worming your Chickens


This is a quick and easy post. During the Early Summer and part of Spring I find it hard to get fresh pumpkins. I do however get Organic Pumpkin Pure Puree. I found with much time and effort that my chickens do not want pumpkin mush. I could not find anything to mix it with that I could sneak it by them. Needing the real thing nothing dry or dehydrated I made up a little recipe of pumpkin and added different herbs or veggie chopped up super find and freeze it in ice cube trays. Easy and nice to give them during the hot months here in So Cal. 


The ingredients are very simple you will need a can of all natural Pumpkin Puree and some ruffage to add to it. I also use parsley, dill and other herbs from the garden. 


You will need a ice cube tray. These are easily found and purchased at any dollar tree or 99 cent store. I have a few for freezing chopped garlic, ginger, jalapeno the list goes on and on.


Chop your fresh ingredients first. I chopped some fresh carrot's from the garden as well as parsley.

Now get your pumpkin puree into a bowl and add the rest of your ingredients. 


Mix it well 


Then you will put this into your ice cube trays. Gather all your ingredients and your ice cube trays. 


The process is so simple fill the trays and smoosh the ingredients into the trays and 
then scrape any extra from the top. 


Put them into the freezer once frozen I pop them into a mason
jar and return to the freezer until it is time to use them. I have a couple of chicken that will not touch them but during the time of year when pumpkins are not plenty and also when it is hot they love them.


California Poppies and their seeds


Yes this may look like a bunch of useless long thing-a-ma giggers. Nope at our last Seed Swap a women left me a large bag of California Poppy cuttings. LUCKY US !


I got right to work. Let me give you a bit of California Poppy information. Known also as California sunlight, cup of gold, golden poppy, and the list goes on. Grow from the United States to Mexico this flower is beautiful as well as very popular. Although it is illegal to pick poppy plants unless it is on a property you own or know the owner. 


It is an ornamental plant that flowers through out Spring and Summer. It has cup shaped flowers of yellow, orange or red. In the hills of Southern California there is are many beautiful area's near Gorman, Bear Valley and San Luis Obispo where the mountain's light up with Poppies in Spring through Summer. A popular go to destination for many locals as well as visitors. 


This little flower is also used for a garnish on many foods. 

In 1903 it became the official flower of California.

The petals close in the evening and open up the next morning. Although they do not open in cloudy weather. They are self pollinating and come back every year with the right soil and care. 


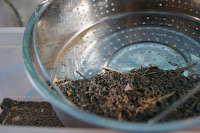
Here is a picture of the poppies ready to have the seeds released. I took the whole bag one section at a time and threw them into the colander.  


A little shake and smash a bit time consuming but worth the time. I got a load of beautiful seeds to share with all my neighbor's and friends. Plus many for our Little Seed Exchange Library. 


The seeds are tiny and so cute. I do think I will toss many of these little wonders on my hill, below the patio, by the barn. Ok TMI

We have plenty to share out in the Little Seed Exchange Library as well as at our Monthly Events. 


Sunday

Collecting Yarrow Seeds


Yarrow this plant is a multitasker. I always used it to attract and feed Monarch Butterflies. I have come to find out after doing a little research that this plant has so many great benefits both for your health and your garden. 

Yarrow is an herb. The above ground parts are used to make medicine also. I have put a link at the end of this post for you to grab more information on its medicinal uses.


Collecting the seeds could not be easier. I spent years with this in my garden without realizing that the seeds were bountiful and easy to collect

This flower comes in a variety of colors but you see yellow and orange here in Southern California mainly. 

Let's get right to collecting the seeds since that is why you are here. Once the plant has flowered for its season. 

This will last from late spring throughout summer. I do not cut back my yarrow so I have the seeds once they have dried.


Here is a picture of the stocks I cut off for the seeds. The seeds when left on the plant long enough will just naturally fall off and reproduce but they need water and sunshine. So better to save them for Spring Planting.


Gather all the yarrow stalks you need there are a bazillion seeds on each one. 


I first cut the stem off and put the dried flower into the palm of my hand and gently roll it over a colander.


The seeds may be mixed with the plant head itself so I gently roll them in the colander. They will drop into the pie tin and from there I will bag and label them.

Most seed are so easy to get from a dried plant that at times I do have to giggle when I see people buying them. But on the other hand you do have to buy many seeds you do not harvest or collect. So I have to say every Spring I order my seeds for my spring garden usually ones that are unusual and rare. 


So many right? It is truly amazing what these flowers produce. I think they give me the most seeds of any of the ones I collect. Alright now bag them and have them ready for Spring and Sumer flowers for your butterflies.

 Here is a link all about the Yarrow plant.


Yarrow as an Herb Based Medicine. Another great resource.

Broccoli Seeds


This was a good experiment letting my broccoli go to seed. What a great lesson in gardening. I am getting more into letting some of  my vegetables and flowers go to seed. My sister  Casey use to let her Delphinium and other flowers go to seed and would give me seeds all the time. I am still finding paper bags of seeds from her. I thought she was a bit nutty but now I see her point.


To the left you see a broccoli plant that I did harvest quite a lot from. Once I was done with it I let it go to seed. See the pretty yellow flowers?


Now it has grown out as much flowers as I think it can.  It gets long and stocky. 
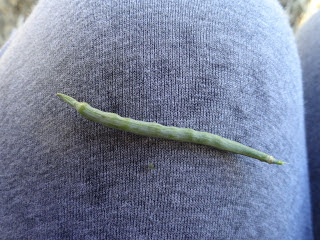
The seeds are strange looking they are long like a green bean with anorexia.


Here are the direction:


1. Allow the broccoli plant to bloom instead of harvesting when it is in the bud stage.  The broccoli plant will send up a flower stalk covered with yellow flowers that are very attractive to bees and other pollinating insects during the blooming process.


2. Place a paper bag over the broccoli flower when the seed pods are brown and beginning to split open. You can see the black broccoli seeds inside the split seedpods when the seeds are ready to harvest.

3.Grasp the paper bag with one hand so it creates a seal around the stem. Cut the stalk with a pair of hand-held garden shears so the flower head remains in the bag. This prevents seeds from falling to the ground when the flower stalk is moved.

4. Turn the flower head upside down so it stays in the bag.

5. Remove the flower head from the paper bag and spread the seeds on the dry newspaper. Crumble the seed pods to release the numerous broccoli seeds and separate the seeds from the dried plant material. Allow the seeds to dry for three weeks while spread over the dry newspaper in the warm and dry location.

Place seeds in a dry jar with a tight-fitting lid and store at room temperature until the following season. Broccoli seed will remain viable for one year if dried and stored properly.

Tomato Seeds

 Saving seeds is a hobby I just love. There are some rules to this hobby. The main thing is you do not want to save seeds from any store bought fruit or vegetables. Those could have been sprayed with pesticides and also almost 99% of store bought fruit and vegetables are hybrid which means they will only produce one generation.


You can save them if you want to try. 

Get seeds that come from a reliable source:

  • Your Garden
  • Farmers Market
  • Neighbors Garden
Tools you will need:

  • Bowls for each type of seed (Like Beef Steak, Roma etc)
  • Small jars for each variety
  • Strainer
  • Cheesecloth
  • Rubber Bands
  • Small spoon
  • Labels/Small Post its or piece of paper


Back to business take the tomato you want to save the seeds for and cut it in half. You will see the seed and take your spoon and scoop the seeds out into the bowl. Do not worry about the gunk sticking to your seeds we will clean that off later. Once you have gotten the seeds out for both sides of your tomato you can still use that tomato for a meal or snack. 


Do the rest of the tomatoes at the same time keeping them separate and having labels. 
There have been times when I did not label and it was a guessing game the following Spring. 

Now you should have all you seeds out and ready to be cleaned. 


Take each bowl and pour your gunky seeds into the strainer run cold water over them while lightly rubbing the gunk off as much as you can. This is only the first cleaning it just get the large stuff off. 


Each different type of tomato seed will have its own container take the seeds and put them in a jar and fill that jar half way up with cold water. Some seeds (the bad ones) will float and then others (the good ones) will sink.  Once they are all cleaned and in their jars cover the jars with cheesecloth and secure with a rubber band. Let them sit for at least one week. This is when they are germinating. 


Now after the one week take each jar and get rid of anything that is floating. If you pour the liquid out gently the top stuff drains out. There may be some extra but that just use a spoon to grab them our. Get your strainer back out and clean the seeds that have sunk to the bottom
 those are the good seeds. 


You will need some paper towels to dry them. Just lay them out on the wax paper or clean plate label it. I don't use the paper towels to dry them they end up sticking and it is a pain in the butt to separate. Once the seeds have dried which takes about 3 weeks they are ready to get bagged. 


I save all containers. The small seeds in this post were saved in an old makeup container and the large batch in an old cassette tape box. Boom

Done! I use bags when I am trading seeds Make them cute they make a great gift with a little garden pot of soil. 


Saving Zinnia Seeds


Zinnia flowers are the easiest flowers to grow from seed. Collecting the seeds is just as easy. This is not going to take to much time to explain. And on top of it I planted some seeds to make sure they are really seeds. It blows me away when I see some types of seeds and say Nahh this can not be a seed. This flower seed is one of them. 

This process is going to be so simple let's get started. Let your Flowers grow. Zinnia's are very hardy and strong. 


When the Zinnia has started to brown and dry up leave it on the stem. I have found the longer you leave anything you expect seeds from the better. It makes the seeds more potent and strong. The seeds of this flower are on the end of each petal. I first cut the dry flower off the stem. The petals of the Zinnia stay in place until you remove them. Cut the Zinnia flowers off and collect them in a vessel of your choice. I use old pie tins for so much of my Seed Saving.


Now that you have the dried Zinnias gently pull the petals off the flower. I keep the colors separate. They still have color left on them even dried up. 

Store the seeds in any container that will keep them dry. I put them in a plain envelope for a few months until I packaged them. Look at the picture of the petals in my hand the seeds are attached to the end. It looks like the seeds are nothing flat and boring But they are good I planted some a few weeks ago and they popped right up.


Separate the leaf from the seed. I have given you pictures to show you what they will look like. 

So there you have it easy peezy good luck and leave any
questions or comments below!

Germinating Lavender Seeds

This year a new experiment is with Lavender. I have collected some seeds from the garden as well as purchased some from are my go to site this year Rare Seeds they have a wide variety of many rare seeds you can no longer get except there. To start my adventure I did a lot of research. I had no idea the lavender needed so much attention. 

Once I got my seeds I did as the lavender pros before me have done. Here is the list of the first things to do

Tools

  • Seeds
  • Paper towels
  • Larger paper bags
  • Refrigerator

Lavender seeds need winter to get their germination process started. Here n Southern California Zone 8/9 we need to fake that winter cold by putting the seeds into damp paper towels. Once they are on the paper towel gently fold them, label and put them into the refrigerator for at least 8 weeks if not longer.


Once the soil has warmed up and the seeds are cold ready we can start yet another long process. Germinating the seeds. This can take up to 4 - 6 weeks. Yes I know the local garden store looks pretty good by now. Last night I was reading the lavender seed packets from the mail order and guess what it said. LOL No need to germinate. What the Help! 

So now this will be two ways to grow lavender. From seed already germinated that we will plant today and continue the from seed germinators. 

PNE Zone 6B is a bit easier yet a long project. But DIY seeds is so rewarding for me. The PNE it's a matter of waiting for your soil to get warm enough. So starting your seeds in February is really a good idea same way wrap them in what toilet papers in the ziplock bag keep them in the refrigerator. Once your soil has warmed up he will be able to put your seeds in the ground.

Amaryllis Seeds how to collect seeds


Amaryllis Flowers are one of many bulbs with flower for your patio or garden. I have started most of mine in a pot on the patio. It was just this year I transplanted some into the garden. The wonderful thing about bulb plants is that they are so easy to care for. They go in the ground bloom and then when they die back they go away only to return the the following year. I love that I always forget but when I see the bloom start I get so excited. 


This post is to show you how to harvest seeds from your amaryllis bulbs. Like any bulb you must let the flower dry and no cutting the stem until it has completely dried. This puts all the energy back into the plant for next season. With that in mind. Keep an eye on the bulb. Here are some pictures and information to help you better understand what you are doing to collect the seeds from the amaryllis plant.


This is the plant when it has stopped it's bloom. The bloom has begun to dry. It will be left with three or four pods on it. They are green when they start to dry you will note the flower leaves are still attached no worries it falls off in time. 


It takes several weeks for these pods to dry out so just leave it alone and be patient. Many a gardener do not want to wait and or have this ugly thing drying in there yard. It is the people who understand and want to propagate seeds that get it. 


You will see in the picture to the right the bud has dried and is beginning to open. This is the time to get the seeds. I cut the dried bulb on to a pie tin or any flat object with a rim. Once you have done this let it dry out for a day or so. Then carefully cut the bulb off into a container. 


Once the pods are cut t is super simple to separate the seeds for planting. Once they have dried for at least two weeks you can propagate them. But that is another post. These seeds take 2 + year to propagate. 

Enjoy

Nasturtiums grow and seed saving

  Nasturtium flower what a delight and easy flower to grow. The bonus is is comes back every year and self seeds your garden on it's own...